Saturday, April 1, 2017

Vanderpump Rules Stassi Schroeder Inspired Chain and Suede Choker


I hate to admit it but I kinda heart Bravo.  I was watching Vanderpump Rules this season and saw this cute little necklace, on Stassi (if you don't know who that is....it doesn't matter).  Anyway, I figured this necklace would be really easy to make and I was right.  I actually like the one I made better than the original (that's right: I'm patting myself on the back and I'm fine with it).  

This necklace is really easy to make and great for casual and work dress as well as for gifts. It only takes about 15 minutes to make. It could actually be cute for bridesmaids, if you want a little edge to tone down pastel sweetness.

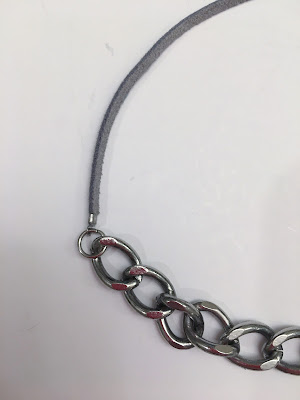
jewelry making tutorial for chain and suede necklace inspired by Stassi Shroeder


jewelry making tutorial for chain and suede necklace inspired by Stassi Shroeder
Part of Stassi Schroeder

Findings:
1 Thick Silver Chain (Michael's)
Gray Suede Flat Cord (Michael's)
4 Cord Closures
*1 Lobster clasp
*1 small jump ring
*3 small jump rings

*I got all my components fromMichael's

**you can just buy a multi pack that has a selection of findings, like this one on Amazon.

Tools:
Assorted Beading Tools
Beading Board (it has rulers on it)


Step 1:

Decide where you want the necklace to fall and measure out the chain. My total necklace is about 16 inches. I have 2 suede cords measuring about 4.5 inches each.  My chain is about 6 inches. (The clasps will make up the remainder of the length)

jewelry making tutorial for chain and suede necklace inspired by Stassi Shroeder


Step 2:
Cut your chain and suede cording.  To cut your chain to size, simply grab a link and bend it open to separate the chain you want from the chain that is leftover. Throw away the bent link. Scissors should be fine for the cording.

Step 3:
Attach cord endings to all the ends of your suede cording.

Step 4:
Attach the chain to the cording using jump rings.

jewelry making tutorial for chain and suede necklace inspired by Stassi Shroeder


Step 5:
With a small jump ring, attach your lobster clasp to one end of the cording.  On the other end, attach a medium jump ring.

jewelry making tutorial for chain and suede necklace inspired by Stassi Shroeder


You have completed your necklace!


Rose Gold and Silver Necklace


This necklace is really easy to make and great for casual, work or wedding wear.  It also makes a wonderful gift.  It is also a great project for those just getting into jewelry making.  It only takes about 30 minutes to make.


Findings:
  1 Silver Chain
box of mixed findings
Lobster Clasps and Jump Rings

  4 Rose Gold Beads (Michael's)
*1 Lobster clasp
*4 small jump rings
*4 looped Headpins

*I got all my components fromMichael's

**you can just buy a multi pack that has a selection of findings, like this one on Amazon.

Tools:
Assorted Beading Tools
Beading Board (I can't live without mine.  It has a ruler.)


Step 1:
Decide where you want the necklace to fall and measure out the chain. Mine is about 16 inches. The pendant is about 2.25 inches.  There are 2 pieces of chain each measuring about 6 inches.

Step 2:
To cut your chain to size, simply grab a link and bend it open to separate the chain you want from the chain that will leftover. Throw away the bent link.

Step 3:
To create your pendant, thread each bead with its own looped headpin.  When you finish off your headpin, just chain them together, like below.  This takes a bit of practice.


Step 4:
With 2 small jump rings, attach your pendant to the chain.

Step 5:
Attach your lobster clasp to one end of the chain with the small jump ring.
On the other end, attach a medium sized jump ring.


You have completed your necklace!


handmade jewelry making necklace tutorial


Friday, March 31, 2017

How to Matte and Texturize Boring Beads!

Sometimes I run into beads that just don't do it for me.  Unfortunately, I purchase them anyway, but that is a whole different issue.  Anyway, I really like the Sally Hansen big Matte top coat.  Its clear nail polish that you can paint on top of any color polish and it will make it matte (not shiny).  

how to jazz up old beads handmade jewelry tutorial

I thought I'd give it a whirl on some beads and it turned out pretty well.  The trick is to use a VERY thin coat and move quickly. However, if you don't move quickly, it adds some texture that looks pretty neat too.  Give it a shot.


Have fun!  

how to jazz up old beads handmade jewelry tutorial


How to Finish Cord and Leather Handmade Jewelry With Cord Closures Tutorial

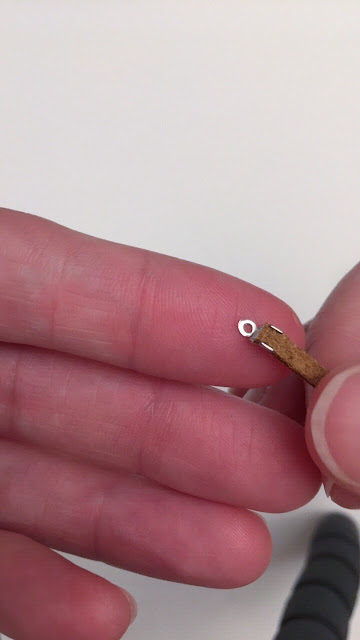
Cord closures are used to attach cording to clasps and other components.  You can use it to group together multiple strands of cord, round leather cord or flat cord, like that in the tutorial.  They are very simple to use.

how to finish cord and leather handmade jewelry tutorial


Here is a picture of a small cord closure I got from Michael's.  It is really small and can hold 1 piece of cord.  They make bigger ones, if you need to fit multiple or bigger strands.

how to finish cord and leather handmade jewelry tutorial

The cord fits between the 2 wings of metal, like so..

how to finish cord and leather handmade jewelry tutorial

Use pliers to close down one wing and then the other.

how to finish cord and leather handmade jewelry tutorial


how to finish cord and leather handmade jewelry tutorial

Once both side are down, I like to clamp them one last time, to make them smooth.

how to finish cord and leather handmade jewelry tutorial

And you are done! Now, you can add a jump ring to your cord ending.

how to finish cord and leather handmade jewelry tutorial


How to Make Joann's Fabric Inspired Leather Snap Clasp Tutorial

These don't take a lot of skill to make, they just require some patience.  However the pay off is worth it!

Handmade leather jewelry clasps with snaps and eyelets and grommets


I bought some leather Clasps from Joanne's Fabric and I loved it...However, they were frequently out of stock and, as you can see, there is little variety.


How to Make Joann's Fabric Inspired Leather Snap Clasp Tutorial

So, I decided to make my own and found out that it is cheaper and soooo insanely awesome!!

Materiels:
Leather strips (Michael's, Joann's, Amazon)
Leather Hole Punch (Amazon, Michael's, Joann's)
Scissors that can cut through your leather
*Grommets/Eyelets (Michael's has large, Joann's has small)
*20L snaps
*Setting tools for snaps and grommets, if they aren't included


Step 1:
I like to start by getting my leather strips, in a variety of colors.

How to Make Joann's Fabric Inspired Leather Snap Clasp Tutorial

Step 2:
I cut out my pattern.  This can really be any shape and size that you want.  Just figure out what looks good on your wrist and cut it out.  It doesn't have to be perfectly straight or symmetrical.   

How to Make Joann's Fabric Inspired Leather Snap Clasp Tutorial

Step 3:
Determine the placement of the holes to be punched.  You can use a felt pen to make dots where you plan to punch.  I actually have a pattern that I use to make all my cutouts. 

I cut out the leather using a pair of heavy duty scissors.  Depending on how tough your leather is, you might be able to use regular scissors to cut your patterns.  

How to Make Joann's Fabric Inspired Leather Snap Clasp Tutorial

Since I am using larger eyelets for this tutorial, I only have 4 holes. However, if you are using smaller eyelets, like Joann's cuffs, then you can make 7 holes.  The Elements eyelets, below, are the exact size of the ones in Joann's cuff.  The are also sold at Joann's.

Leather working grommets and eyelets


Step 4:
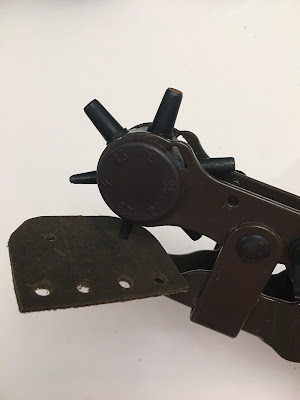
Punch the holes for the eyelets and the snaps.  Below, is a leather punch.  


Leather working hole punch

It has a wheel that spins and makes different sized holes.  For our eyelets, you'll use size 4.  For our snap holes you'll use size 2.5.  

Leather working hole punch

Line up the punch straight over your hole and squeeze hard.  I usually twist the leather clockwise, while I'm squeezing, to make sure all the edges have been severed.  If they haven't, you can let go and reposition the leather and squeeze again.  

Leather working hole punch

Step 5:
Add your grommets.  The grommets may come with setting tool.  If not, then you'll have to get one that is specific to the size grommets that you are using.  

Leather working grommets and eyelets setting

When you place your grommet, remember that the side that you'll be hammering will not be the side that you want people to see.  You can see the difference between the front and back, below.


Leather working snap setting


Place your grommet, face down on the setting anvil. Make sure your anvil is on a hard surface, like stone..not wood.  I use my garage floor, not my countertops.


And use your rubber mallet to tap the grommet until it is bent to the leather. This doesn't take much force.


Step 6:
Add your snaps.  Make sure you have a stone surface. Again, I use the garage floor. You may have to hammer hard, so I don't recommend using countertops or home flooring.  

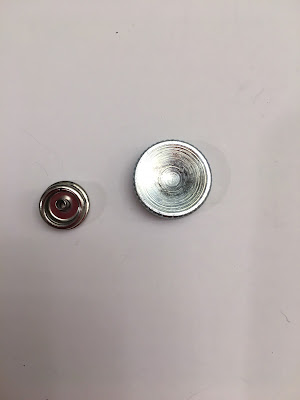
I use size 20L snaps and they came with their own setting tools and instructions for which pieces go together.  I have them lined up in 2 vertical pairs, below. The female side is closest to the setting tool (right side). 


I always pull out the pairs of snaps and match them up before I begin, because some pieces look very similar, and it can get confusing.   The button anvil has one concave side (button face/female side), and one flat side (male side).

Leather working snap setting

Leather working snap setting

If you are a beginner, start with the male side, as it is the easiest to attach.  Attach one male side to your leather. The goal is to tap the setting tool until it rolls the metal in the middle down to keep the snap in place.

Leather working snap setting

Leather working snap setting


Step 7:
Attach the female piece.  The button face will be facing down inside the concave side of the anvil.  

Leather working snap setting

Leather working snap setting

Begin tapping the setting tool until you successfully roll the metal shaft down, attaching the snap to the leather.  Swirl the setting tool around, while tapping, to help evenly roll the sides down.

Leather working snap setting

Step 8:
Test out your work.  The snaps should easily snap together and pull apart.  If the two pieces don't snap together perfectly, then you probably need to tap the metal down further , on both the female and male parts.

It takes a lot of hammering, especially on the female side.  Just make sure not to hit too hard or you'll dent the face of the button.  Lots of consistent taps while swirling the setting tool will work.  This part takes practice. 

Handmade leather jewelry clasps with snaps and eyelets and grommets